google custom search engine(CSE)を使って、検索結果をjsonで取得する
google検索結果を取得しようとした時に、すこし苦労したので手順を整理しておく。
参照したのはここ
Custom Search — Google Developers
API keyの取得
https://cloud.google.com/console/project
まず、上のURLにアクセス
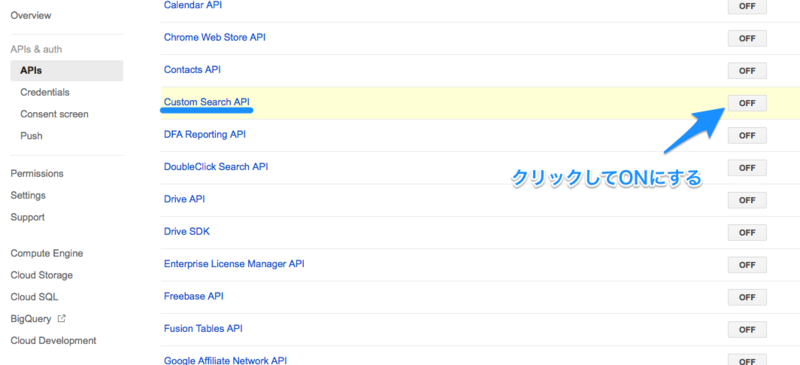
次に規約に同意するので Accept をクリック

①、②、③の順にクリックして
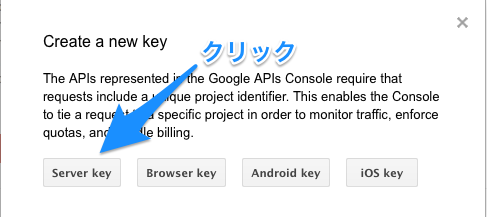
必要な種類のkeyを選択。
今回はServer Keyを作る。
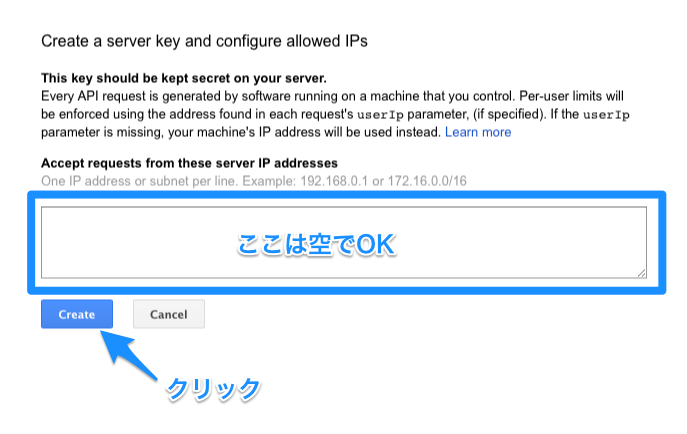
IPアドレスで制限をかけたい場合は、枠の中に書く。
今回は制限を書けないので空のままCreateをクリック
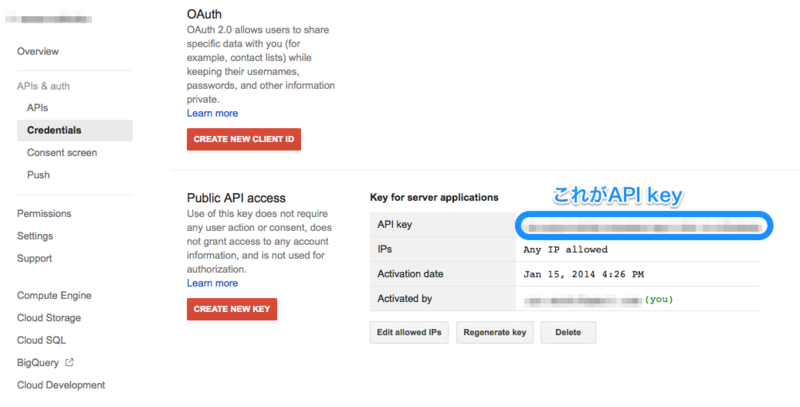
これでAPI keyの作成が完了。
Custom search engine IDの作成
Custom Search Engine
上のURLにアクセス

Addをクリックして、Custom search engineの登録をする
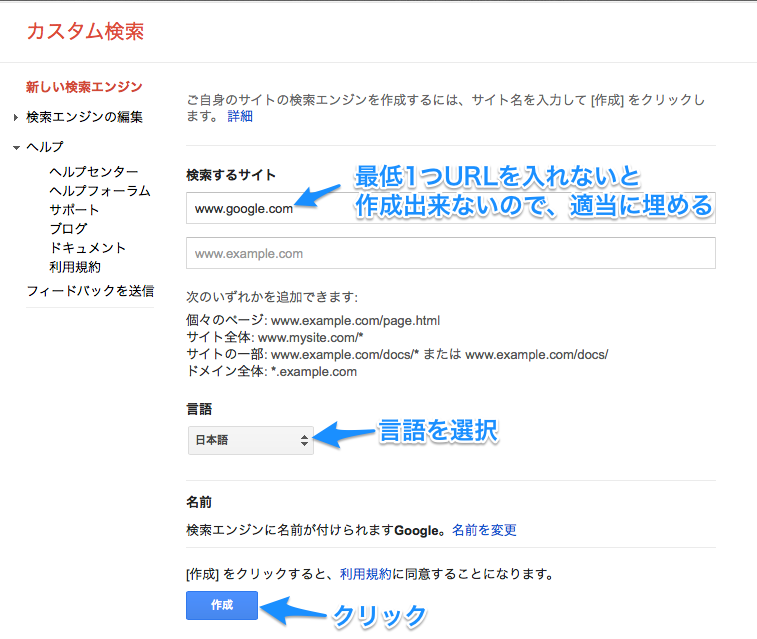
Custom search engineは、本来自分のサイト内検索用のAPIなため、最低ひとつのURLを入れないと作成出来ない。
ここでは適当に入れておき、あとでコントロールパネルから削除を行う。

作成後、表示されるページでコントロールパネルへ
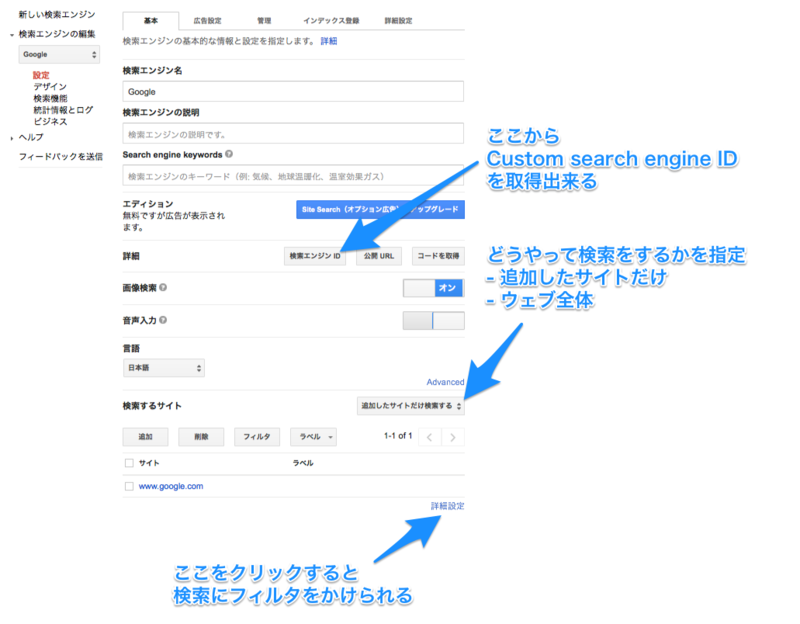
フィルタ等はこのページで指定出来る。
google 全体を検索したい場合、
- ウェブ全体 を指定
- 検索したいサイト を空欄に
するとOK。
Custom search engine IDは、このコントロールパネル内で確認出来る。
検索を行いJSONを取得する
https://www.googleapis.com/customsearch/v1?key={API_KEY}&cx={CUSTOM SEARCH ENGINE ID}&q={SEARCH_WORDS}このURLを使う。
これは検索を行いJSONデータを返却するURLになっている。
なので、任意の言語でjsonからdecodeをして、使用すればおk。
パラメータを少しだけ解説
- key: API key
- cx: Custom search engine ID
- p: 検索用クエリ
とりあえず、上の3つがあれば検索出来るはず。
JSONからサイトの情報を取得する
得られたJSONデータにおいて、itemsにサイトの情報が入っている。
後は実際にデータを眺めてもらえば良いと思うが、一応PHPの簡単なサンプルをおいておく。
このサンプルでは、得られたデータから、1番目に表示されるサイトの情報を取得するところまで行っている。
$cse_url = https://www.googleapis.com/customsearch/v1?key={API_KEY}&cx={CUSTOM SEARCH ENGINE ID}&q={SEARCH_WORDS}';
$search_result = file_get_contents($cse_url, true);
$search_result = json_decode($search_result);
$result_first = $search_result->items[0];
この先で取得出来るサイトの情報は、次の項に書いたパラメータが記載されているURLを参照してもらうと良いかと。
注意点
検索用URLはSSLを使用”しなければならない”。
次のようにhttp://...とすると、
http://www.googleapis.com/customsearch/v1?key={API_KEY}&cx={CUSTOM SEARCH ENGINE ID}&q={SEARCH_WORD}以下のエラーを吐く
{"error":{"errors":[{"domain":"global","reason":"sslRequired","message":"SSL is required to perform this operation."}],"code":403,"message":"SSL is required to perform this operation."}}これに関しては
error in getting userinfo from google drive api - Stack Overflow
ここにある通り。
httpではなくhttpsを使えばOK
https://www.googleapis.com/customsearch/v1?key={API_KEY}&cx={CUSTOM SEARCH ENGINE ID}&q={SEARCH_WORD}
Rails 4.0 で多対多関連
この記事内では、"timeline"モデルと,"user"モデルをどのようにして接続する事が出来るかを見ていきます。
timeline.user
user.timeline
等でアクセス出来るように作っています(つもりです)。
Rubyや、Railsの経験が浅いため、もっと良い方法を知っている方、間違えを見つけた方はコメントを頂けるととてもうれしいです。
またポリモーフィズムを使用した関連付けに関しては触れていません。
あくまで導入部分だと思って参照して頂ければとおもいます。
HABTM
has_and_belongs_to_many を使った例。
モデルをいくつかの種類に分けて参照させたいときなどに便利です。
#/app/models/user.rb
class User < ActiveRecord::Base
  has_and_belongs_to_many :timelines_member, :class_name => 'Timeline',
                          :foreign_key => :member_timeline_id, :association_foreign_key => :member_id,
                          :join_table => :timelines_members

  has_and_belongs_to_many :timelines_observer, :class_name => 'Timeline',
                          :foreign_key => :observer_timeine_id, :association_foreign_key => :observer_id,
                          :join_table => :timelines_observers
end
#/app/models/timeline.rb
class Timeline < ActiveRecord::Base
  has_and_belongs_to_many :members, :class_name => 'User',
                          :foreign_key => :member_id, :association_foreign_key => :member_timeline_id,
                          :join_table => :timelines_members

  has_and_belongs_to_many :observers, :class_name => 'User',
                          :foreign_key => :observer_id, :association_foreign_key => :observer_timeine_id,
                          :join_table => :timelines_observers
end
#/db/migrate/[TIMESTAMP]_timelines_members.rb
class TimelinesMembers < ActiveRecord::Migration
  def change
    create_table :timelines_members, id: false do |t|
      t.integer :member_id, null: false
      t.integer :member_timeline_id, null: false
    end
    add_index(:timelines_members, [:member_id, :member_timeline_id], :unique => true)
  end
end
#/db/migrate/[TIMESTAMP]_timelines_obserbers.rb
class TimelinesObservers < ActiveRecord::Migration
  def change
    create_table :timelines_observers, id: false do |t|
      t.integer :observer_id, null: false
      t.integer :observer_timeline_id, null: false
    end
    add_index(:timelines_observers, [:observer_id, :observer_timeline_id], :unique => true)
  end
end
HM with relationship table
has_manyとbelongs_toで関連を作るのですが、2つのモデルの間にrelationshipテーブルを挟む方法です。
2つのモデルの間に”状態”等のステータスを持たせたい場合に有効です。
#/app/models/user.rb
  has_many :timeline_user_relationships
  has_many :timelines, :through => :timeline_user_relationships
end
#/app/models/timeline.rb
class Timeline < ActiveRecord::Base
  has_many :timeline_user_relationships
  has_many :users, :through => :timeline_user_relationships
end
#/app/models/timeline_user_relationship.rb
class TimelineUserRelationship < ActiveRecord::Base
  belongs_to :user
  belongs_to :timeline
end
#/db/migrate/[TIMESTAMP]_create_timeline_user_relationships.rb
class CreateTimelineUserRelationships < ActiveRecord::Migration
  def change
    create_table :timeline_user_relationships do |t|
      t.references :user, index: true
      t.references :timeline, index: true
      t.integer :role

      t.timestamps
    end
    add_index(:timeline_user_relationships, [:user_id, :timeline_id], :unique => true)
  end
end
create_join_table
Rails 4.0から追加されたものです。
Railsドキュメントにも記載されています。
http://railsdoc.com/migration#テーブルを結合して作成(create_join_table)
手軽に作成出来るので、とりあえず関連をつけたいという時に使うと良いかと思います。
#/app/models/user.rb
class User < ActiveRecord::Base
  has_and_belongs_to_many :timelines
end
#/app/models/timeline.rb
class Timeline < ActiveRecord::Base
  has_and_belongs_to_many :users
end
#/db/migrate/[TIMESTAMP]_create_timelines_users.rb
class CreateUsersGroups < ActiveRecord::Migration
  def change
    create_join_table :timelines, :users
    add_index(:groups_users, [:group_id, :user_id], :unique => true)
  end
end
ざっと3種類紹介しましたが、option等は必要になった際に使ってみて追加していこうと思います。
FrozenBear v1.4.0

先日、FrozenBear最後(?)の主要バージョンとなる、バージョン1.4.0をリリースしました。
昨年冬に最初のリリースを行い、季節の巡りとともに、FrozenBearのアップデートを重ねて参りましたが、ここで一区切りとなります。
二度目の冬は、明るい陽の光がきれいです。
末永くお使いいただける事を願っております。
rspec-rails (2.14.0) + devise (3.2.1, 3.2.0) + capybara (2.2.0) でsign in判定
deviseを使っていて、rspec内でサインインしているかどうかの判定をしたいときのやり方。
バージョンごとに微妙に変化があるようで、実際に動作確認したのはタイトルのもののみです。
他のバージョンに関しては、この記事では対応出来ない可能性があるため、注意してください。
1つずつ注意点を確認して行きます。
最終的な結論は記事の下の方にコードをおいておくので、やり方だけ分かれば良いという人は下までスキップしてください。
devise
deviseを使う際に問題になる事の1つに、rspecでのsign in、sign outの検証が、deviseが提供する’sign_in’と’sign_out'メソッドでは出来ないという事があります。
そこで、以下のページで解決策が提示されています。
https://github.com/plataformatec/devise/wiki/How-To:-Test-with-Capybara
このページではまず、Capybaraによって提供されるメソッドを使って、Sign inフォームを直接埋めることでsign inする事を推奨しています。しかし推奨した後に、この方法ではテストの数が増えた時に時間がかかってしまうとも言っています。
そこで、warden test helpersというヘルパーを用いてこの問題を解決する方法が書かれています。
そして、なぜ’sign_in’と’sign_out’メソッドを使わないかというと、以下のような理由らしいです。
If you're wondering why we can't just use Devise's built in sign_in and sign_out methods, it's because these require direct access to the request object which is not available while using Capybara. To bundle the functionality of both methods together you can create a helper method.
翻訳(適当)すると
『なぜDeviseによって提供されている’sign_in’と’sign_out’メソッドを使わないのか疑問に思うだろう。その理由は、Capybaraを使っている時には使う事のできない”request object”に直接アクセスする必要があるから。なので、それら2つのメソッドを持っているヘルパーメソッドを自分で作ってやる必要がある。』
らしいです。
という事で、deviseの問題はwarden test helpersで解決する事が出来ます。
capybara
rails_tutorial(http://railstutorial.jp/?version=4.0#top)をやっていると、capybaraを使用しているspecが spec/requests というフォルダ内にある事に気がつくかもしれません。
そうして、capybara v2.2.0でも同じようにするとうまくいかなくてはまります。
2.2.0では仕様変更があったらしく、capybaraが動作するのは <b>spec/features</b> 内のファイルに対してとなっています。
ここを間違えていると、いくらdeviseの問題を解決してもテストが通りません。
また、Capybaraを使用するためには、rspecに Capybara::DSL をincludeする必要もあります。
結論
以上2つの問題を解決するよう定義したspec_helperが以下になります。
#spec/spec_helper.rb

# This file is copied to spec/ when you run 'rails generate rspec:install'
ENV["RAILS_ENV"] ||= 'test'
require File.expand_path("../../config/environment", __FILE__)
require 'rspec/rails'
require 'rspec/autorun'

# Requires supporting ruby files with custom matchers and macros, etc,
# in spec/support/ and its subdirectories.
Dir[Rails.root.join("spec/support/**/*.rb")].each { |f| require f }

# Checks for pending migrations before tests are run.
# If you are not using ActiveRecord, you can remove this line.
ActiveRecord::Migration.check_pending! if defined?(ActiveRecord::Migration)

RSpec.configure do |config|
  # ## Mock Framework
  #
  # If you prefer to use mocha, flexmock or RR, uncomment the appropriate line:
  #
  # config.mock_with :mocha
  # config.mock_with :flexmock
  # config.mock_with :rr

  # Remove this line if you're not using ActiveRecord or ActiveRecord fixtures
  config.fixture_path = "#{::Rails.root}/spec/fixtures"

  # If you're not using ActiveRecord, or you'd prefer not to run each of your
  # examples within a transaction, remove the following line or assign false
  # instead of true.
  config.use_transactional_fixtures = true

  # If true, the base class of anonymous controllers will be inferred
  # automatically. This will be the default behavior in future versions of
  # rspec-rails.
  config.infer_base_class_for_anonymous_controllers = false

  # Run specs in random order to surface order dependencies. If you find an
  # order dependency and want to debug it, you can fix the order by providing
  # the seed, which is printed after each run.
  #     --seed 1234
  config.order = "random"

  # for Capybara : Capybara用のDSLをinclude
  config.include Capybara::DSL

  # for Devise : Deviseを使用している時にsign in/outを取るためのヘルパーをinclude
  include Warden::Test::Helpers
end
さらに、capybaraは必ず spec/features フォルダー内で使用してください。
そうしないとvisitやpageが定義されていません、というようなエラーが出て、テストが赤くなります。
最後に、実際にログイン、ログアウトの処理の仕方を確認します。
login_as(user, :scope => :user)     #ユーザーをadmin falseでログイン
logout(:user)     #ログインしているユーザーをログアウトさせる
上記2つのメソッドで、ログイン、ログアウトの処理を実行します。
下にサンプルのspecファイルをおいておいたので、照らし合わせて確認してみてください。
#spec/features/application_controller_spec.rb  !!features 直下であることに注意
require 'spec_helper'

describe 'ApplicationController' do

  let(:user) { FactoryGirl.create(:user) }

  describe 'header' do

    describe 'has menus' do

      before { visit root_path }

      specify 'whenever a user is signed in or not' do
        expect(page).to have_link('Home', root_path)
      end

      specify 'when a user is signed in' do
        login_as(user, :scope => :user)
        visit root_path

        expect(page).to have_link('Sign out', destroy_user_session_path)
        expect(page).not_to have_link('Sign up', new_user_registration_path)
        expect(page).not_to have_link('Sign in', new_user_session_path)
      end

      specify 'when a user is signed in' do
        logout(:user)

        expect(page).to have_link('Sign up', new_user_registration_path)
        expect(page).to have_link('Sign in', new_user_session_path)
        expect(page).not_to have_link('Sign out', destroy_user_session_path)
     end
    end
  end
end
Ruby 2.0, Rails 4.0, devise, mysql, rails_admin の初期設定メモ
ruby2.0 rails4.0の環境が整っている事を前提とします。
プロジェクト作成
$ rails new sample —database=mysql
データベースの設定(developmentのみ表記、他は割愛)
まず、以下の記述があるか確認。無ければ各自付け足してください。
# Gemfile


# Use mysql as the database for Active Record
gem 'mysql2'
念のためターミナルから以下を実行して、mysql2をインストールする。
$ gem install mysql2
設定ファイルを編集。
mysqlのユーザーは各自作成しましょう。(追記するかも)
ここで注意点。
パスワードはクォートで囲う必要がある様です。ruby初心者のため、細かい原因が分からないのですが、多分パスワードが数字だったのが悪いのかと思います。試していませんが(試せ)、もしかしたらユーザー名も、数字の時はクォートで囲うべきなのかもしれません。
これに関してはstackoverflowに回答がありましたが、どこにあったか分からなくなりました(探せ)。
# config/database.yml

development:
  adapter: mysql2
  encoding: utf8
  database: sample_db
  pool: 5
  username: sample_mysql_user
  password: ‘user_password’
  host: localhost
  socket: /tmp/mysql.sock
その後ターミナルに戻り、以下を実行。
db:setupはdb:createの処理もやってくれるので、db:createは冗長なのですが、下に書くエラーが出るのがdb:createのタイミングなので、一応。
$ rake db:create
$ rake db:migrate
これでデータベースとテーブルの作成が完了。
config/database.ymlにてパスワードを囲わなかった場合のエラーは以下のようになる。
$ rake db:create —trace
と叩くと
** Invoke db:create (first_time)
** Invoke db:load_config (first_time)
** Execute db:load_config
** Execute db:create
no implicit conversion of Fixnum into String

……….

Couldn’t create database for {“adapter”=>”mysql2”, “encoding”=>“utf8”, “database”=>”sample_db”, “pool”=>5, “username”=>”sample_mysql_user”, “password”=>user_password”, “host”=>”localhost”, “socket”=>”/tmp/mysql.sock”}
と表示され、rake db:migrateを叩いても同じようなエラーとなります。
一応メモとして。
deviseとrails_adminの設定
まずGemfileに以下を記述
# Gemfile
     .
     .
     .
gem ‘devise’
gem ‘rails_admin'
その後、コンソールにて
$ bundle install
と叩く。
devise
$ rails g devise:install


===============================================================================
Some setup you must do manually if you haven't yet:
  1. Ensure you have defined default url options in your environments files. Here
     is an example of default_url_options appropriate for a development environment
     in config/environments/development.rb:
       config.action_mailer.default_url_options = { :host => 'localhost:3000' }
     In production, :host should be set to the actual host of your application.
  2. Ensure you have defined root_url to *something* in your config/routes.rb.
     For example:
       root :to => "home#index"
  3. Ensure you have flash messages in app/views/layouts/application.html.erb.
     For example:
       <p class="notice"><%= notice %></p>
       <p class="alert"><%= alert %></p>
  4. If you are deploying on Heroku with Rails 3.2 only, you may want to set:
       config.assets.initialize_on_precompile = false
     On config/application.rb forcing your application to not access the DB
     or load models when precompiling your assets.
  5. You can copy Devise views (for customization) to your app by running:
       rails g devise:views
===============================================================================
上の指示通りに設定を行う。
1
# config/environments/development.rb
     .
     .
     .
     # for devise
     config.action_mailer.default_url_options = { :host => 'localhost:3000' }
end
2
まだcontrollerを作成していないので、後回し
3
# app/views/layouts/application.html.erb
     .
     .
     <%= yield %>

       <p class="notice"><%= notice %></p>
       <p class="alert"><%= alert %></p>
     .
     .
4
今はrails4.0以上を使う事前提なので、この設定は必要なし。
5
viewを作成する際に行う。
これで、devise側から指示された設定はひとまず完了。
次にUserモデルを作成する。
Userには管理者であるかないかという属性を持たせたい。
今回は、deviseのhowtoにあるoption 2を選択する(以下URLを参照)。
https://github.com/plataformatec/devise/wiki/How-To:-Add-an-Admin-role#option-2---adding-an-admin-attribute
そこで、次のコマンドを叩く
$ rails g devise User
$ rails generate migration add_admin_to_users admin:boolean
そして、生成されたmigrationファイルを以下のように編集。
# db/migrate/${DATE_CREATED}_add_admin_to_users.rb


class AddAdminToUsers < ActiveRecord::Migration
  def self.up
    add_column :users, :admin, :boolean, :default => false
  end

  def self.down
    remove_column :users, :admin
  end
end
rails_admin
$ rake g rails_admin:install
2つ聞かれるが、今回はadminをuserに組み込む事にしたので、両方、空のenterを押してしまえばよい。
これでrails_adminの設定は完了。簡単。
deviseとrails_adminの設定が終わったので
$ rake db:migrate
する。
あとはcontrollerを作成して、routeを追加して、viewを作成する。
テスト出来るように、手順を残しておく。
今回はroot home#indexを使う。deviseが例を書いてくれているrouteです。
$ rails g controller home index
# app/controllers/home_controller.rb

class HomeController < ApplicationController

  before_filter :authenticate_user! # 追加

  def index
  end
end
こうして、railsサーバーを立ち上げる。
$ rails s
を見てみると、deviseにより作られた画面が表示されるので、sign upボタンを押して、登録すると、rails_adminの画面を見る事が出来る。
以上。
随時追記or変更して行く予定。